How To Check Your Car's Oil Level: A Simple Guide
Do you know what one of the most straightforward, yet critically important, maintenance tasks for your vehicle is? Regularly checking your engine oil level is the single most effective way to prevent costly engine damage and ensure your car runs smoothly.
Maintaining your vehicle's engine oil level is not merely a suggestion; it's a cornerstone of responsible car ownership. The health of your engine, and by extension, the longevity of your vehicle, hinges on this simple practice. Failing to keep a close eye on the oil level can lead to a cascade of mechanical failures, leaving you with hefty repair bills and unnecessary downtime. Checking the oil level regularly provides an early warning system, alerting you to potential problems before they escalate. It's a proactive measure that helps you identify leaks, monitor oil consumption, and catch any internal engine issues that might be brewing.
Here's a quick look at why this is so crucial:
- Lubrication: Oil lubricates the engine's moving parts, reducing friction and wear. Insufficient oil means increased friction, leading to heat buildup and potential damage.
- Cooling: Oil helps cool the engine by absorbing heat and carrying it away from critical components. A low oil level compromises this cooling function.
- Cleaning: Oil suspends contaminants like dirt and debris, preventing them from clogging the engine. Reduced oil volume means a lower capacity to trap and remove these particles.
- Sealing: Oil helps seal the gaps between pistons and cylinder walls, maintaining compression. Low oil levels can affect compression and engine performance.
| Aspect | Details |
|---|---|
| Purpose | To monitor and maintain the engine oil level, preventing damage and ensuring smooth operation. |
| Frequency | Check the oil level every time you refuel your vehicle. Checking the oil regularly is very important for avoiding damage to the engine. |
| Procedure |
|
| Signs of Low Oil |
|
| Tools and Materials |
|
| Consequences of Neglect |
|
| Additional Tips |
|
Before you even think about starting your engine, take a moment to consider the importance of this simple ritual. To get an exact reading, wait up to 30 minutes after you have switched off your car's engine. When the engine is off, the car is on a level surface, and after at least 5 minutes of inactivity to allow the oil to settle, we get precise measurements.
Now, let's delve into the specifics of this essential task. Checking the oil level is not a complex operation, but it does require a methodical approach. The procedure is similar across most makes and models, making it a universally applicable skill for car owners.
Heres how to correctly check your engine oil level without starting the vehicle:
- Preparation: Park your car on a level surface. This ensures an accurate reading. If the vehicle is tilted, the oil will shift, leading to an incorrect assessment of the level.
- Engine Cool-Down: Allow the engine to cool down. Preferably, check the oil when the engine is cold. This allows all the oil to settle in the oil pan (also known as the oil sump), providing the most accurate measurement.
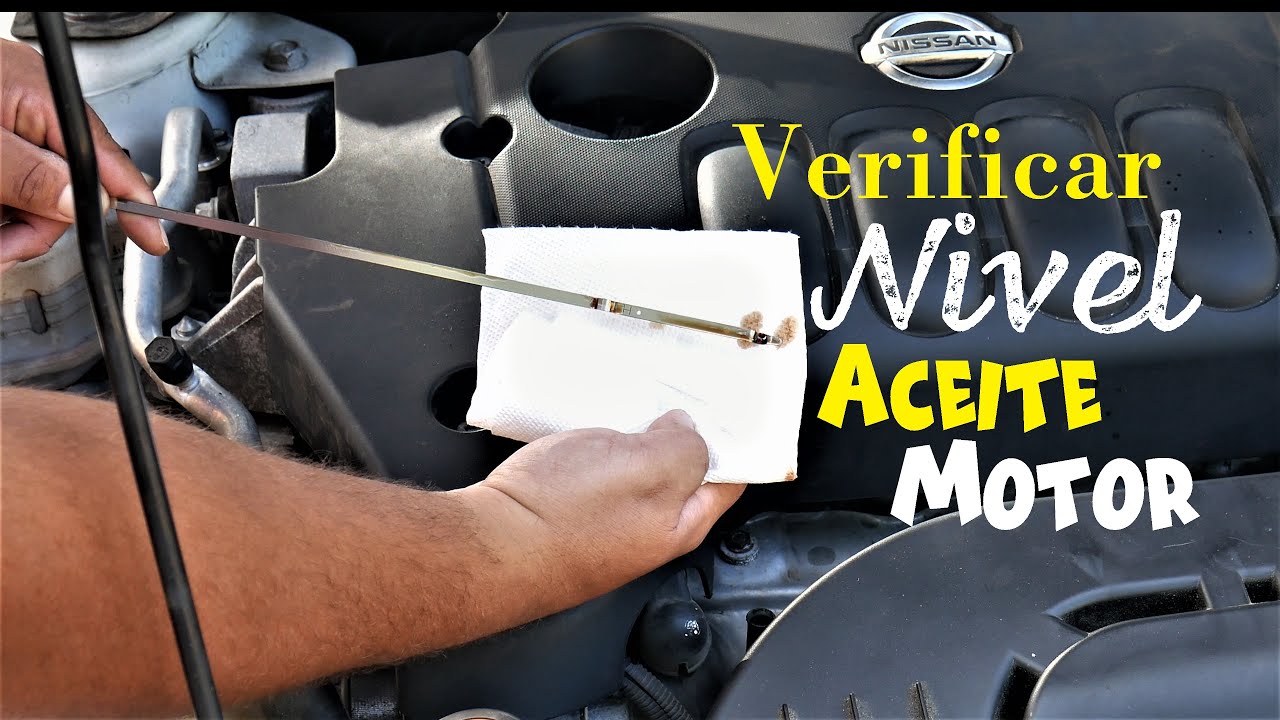
- Locate the Dipstick: Open the hood of your car. The dipstick is usually marked with an oil can symbol and is often brightly colored (yellow, orange, etc.). Consult your owner's manual if you're unsure of its location.
- Remove and Wipe the Dipstick: Pull the dipstick out of its tube. Wipe the dipstick clean with a clean rag or paper towel.
- Reinsert the Dipstick: Fully reinsert the dipstick into its tube. Make sure it is pushed all the way in.
- Remove and Read the Dipstick: Pull the dipstick out again. Observe the oil level on the dipstick. Most dipsticks have minimum and maximum marks or a crosshatched area indicating the acceptable oil level range.
- Assess the Oil Level: The oil level should be between the minimum and maximum marks or within the crosshatched area.
- Add Oil If Needed: If the oil level is below the minimum mark, you'll need to add oil. Refer to your owner's manual for the correct type and grade of oil for your vehicle.
- Add Oil Carefully: Remove the oil filler cap (usually found on the engine valve cover). Use a funnel to pour the oil into the filler opening. Add oil in small increments, checking the dipstick after each addition to avoid overfilling.
- Check for Leaks: After adding oil, check around the oil filler cap and the dipstick tube for any signs of leaks.
- Replace the Dipstick and Cap: Once you've checked the oil level and added any required oil, reinsert the dipstick fully and tighten the oil filler cap.
Several indicators might suggest your vehicle requires more oil. Changes in engine sounds, such as knocking or metallic noises, can be a sign that the engine isnt receiving adequate lubrication. Low oil pressure can also trigger a warning light on your dashboard, signaling that the oil level is insufficient. A drop in engine performance, such as reduced power or sluggish acceleration, can also be a clue. Further, you may notice increased oil consumption or the presence of oil leaks, which will further highlight your need for a check-up. Checking the oil with the engine off is a more conventional and safe method to check the oil level in the engine. This allows the oil to settle in the oil pan, allowing for a precise and stable measurement of the oil level without interference from its circulation.
Regularly checking the engine oil level is crucial to ensure the proper functioning of the vehicle and prevent possible mechanical problems. Performing this simple task regularly allows us to detect possible problems in the engine early and avoid more significant damage. It also helps us keep the engine in good condition and prolong its useful life. The car's engine oil must stay within the minimum and maximum levels. If the oil level is below the low-level mark, you must add oil to the engine and reset.
For a correct oil level measurement, the vehicle must be on a flat surface. You should wait about five minutes after turning off the engine for the engine oil to flow back into the oil pan. Remember that the oil change interval may vary depending on the type of oil, the engine lubrication system, and the driving conditions. In general, it is recommended to change the oil every 5,000 to 8,000 kilometers or every 6 months, whichever comes first.
Now, let's explore how to measure engine oil level. Measuring the engine oil level helps prevent failures and avoid mechanical damage that can, in the short or medium term, generate inconveniences in your car. It is easy to check the engine oil in most car brands and models. While the procedure is almost universal, there are a few nuances.
In the case of the second aspect, if the car is not on a flat surface, the oil will move from the tank to other parts due to the car's inclination, so you will get an incorrect value when measuring the level, depending on whether the car is up or down, whether there is too much or too little oil.
One of the best times to check your car's oil is when the engine is cold. This allows the oil to settle and gives you a more precise reading of its level and quality. For correct measurement of the oil level, the vehicle must be on a flat surface.
The interval for oil changes can change depending on the type of oil, engine lubrication system, and driving conditions.
In general, it is recommended to change the oil every 5,000 to 8,000 kilometers or every 6 months, whichever comes first.
When it comes to checking your car's oil, timing is everything. Review the oil with the engine off is a more traditional and safer method of checking the oil level in the engine. By doing so with the engine off, the oil is allowed to settle in the sump, which facilitates a precise and stable measurement of the oil level without interference from its circulation.
Remember that the oil change interval may vary depending on the type of oil, the engine lubrication system, and the driving conditions. The oil of the car's engine must stay within the minimum and maximum levels. If that happens, the performance will not be optimal. When the engine is cold, all the oil accumulates in the oil pan, providing a more precise reading of the level. Reviewing the hot oil can be dangerous due to the high temperatures.
If, when checking the engine oil level as it should be checked, you realize that it is low, it is important that you take immediate action. Locate the oil container cap; it has the same symbol that lit up on your dashboard. Some models include the recommended oil brand logo. Never empty oil into the bayonet slot. If your vehicle requires it, refill the oil pan or container. Turn the container cap to open it and, using
The key to longevity in your car is regular maintenance, and this includes routine fluid checks. This guide specifically highlights engine oil, but the same principles apply to other essential fluids like transmission fluid. Understanding the function of each fluid is critical to keeping your car running smoothly and efficiently.
Transmission fluid is just as vital for distributing power from the engine to the drivetrain. It is located mostly at the level of the gearbox. Broadly speaking, transmission oil regulates the degree of friction between the parts of said system. Heres how to check transmission fluid.
- Park Your Car: Place the car's gear lever in neutral or in the parked position.
- Warm Up the Engine: Allow the engine to warm up and leave it running throughout the operation, unless the vehicle's owner's manual indicates otherwise.
- Locate the Dipstick: While transmission fluid dipsticks are not common in all cars, many have them. Check your car's owner's manual if you are unsure of the location of the dipstick.
- Check the Fluid: Remove the dipstick and wipe it with a clean cloth. Reinsert it completely into the tube and remove it again. Check the fluid level and condition. If it's low or dirty, take your car in for service.
Some automatic transmission fluid levels are checked with the engine off. This is because the process of checking the oil level in these transmissions can be more complex and requires special tools and specific procedures. The correct way to do it is with the engine running. Transmission fluid has to be just right. It should not be less and neither too much, as it will affect the performance.
This video explains step by step how to measure the automatic transmission oil of a Honda CRV truck.
Here I will show you how the manufacturer recommends checking the transmission and engine oil levels of a Honda Civic EX car.
The level of transmission oil affects the operation.


